Post by petero on Aug 1, 2013 0:05:02 GMT -5
I recently bought a '99 MS LTD 3.5L with 120,000 miles that appears to have never driven off paved roads. However, one problem I found after I bought it was that it left a cloud of smoke after idling. This, I learned, was due to worn valve stem seals. Since the cost to have them replaced by a shop would be a large fraction of what I just paid for the truck, and because I wanted to get to know it better anyway, I decided to do it myself. I could not find a complete DIY for my particular vehicle, but there were plenty of useful resources to get me through it. Below are some links to websites and videos that I used to guide me through the process. Still, I learned a few things to pass along here. This narrative is not intended to guide anyone through the ordeal; its just a supplement to what's already out there. Sorry if you're reading this in the remote future and the links are all dead. These are in no particular order:
www.mitsubishi-forums.com/index.php?showtopic=58569&st=0#entry321073
www.youtube.com/watch?v=gDPgVfeLBhQ
www.4x4wire.com/mitsubishi/tech/lower_plenum/
www.justanswer.com/mitsubishi/7leiw-mitsubishi-montero-sport-ls-need-replace-valve-cover.html
www.monterosportonline.net/?page_id=531
www.4x4wire.com/forums/showflat.php?Cat=81&Number=1147478&page=1&fpart=1&vc=1
www.youtube.com/watch?v=yYHoKfBxLLs
www.4x4wire.com/forums/printthread.php?Board=UBB93&main=369544&type=post
www.3si.org/forum/f58/make-your-own-valve-spring-compressor-15-a-217700/
www.youtube.com/watch?v=ABOm_Usrf4k
www.youtube.com/watch?v=aP9GJuHO7N8
You should know that this is not an easy job. I'm an OK shadetree mechanic, with experience just maintaining my own older cars for almost 30 years. I have a nice garage and a decent set of tools. This pushed my limits and took me about 16 hours. There are people on this board who know way more than me about this, and I hope they correct anything incorrect or misleading here. In the end, nothing really went wrong, and there is no more smoke.
There are plenty of instructions for how to remove the valve covers. That much took me about 3 hours, while taking notes and photos. The previous owner had replaced the plugs at 90,000 miles, so there were no problems getting things apart. I chose to leave the throttle body attached to the intake and completely remove them together, which required draining a gallon of coolant, because I just wanted everything out of the way.
I used compressed air (with a cheap little HF compressor) to hold the valves place after removing the springs. Did not regulate the pressure.
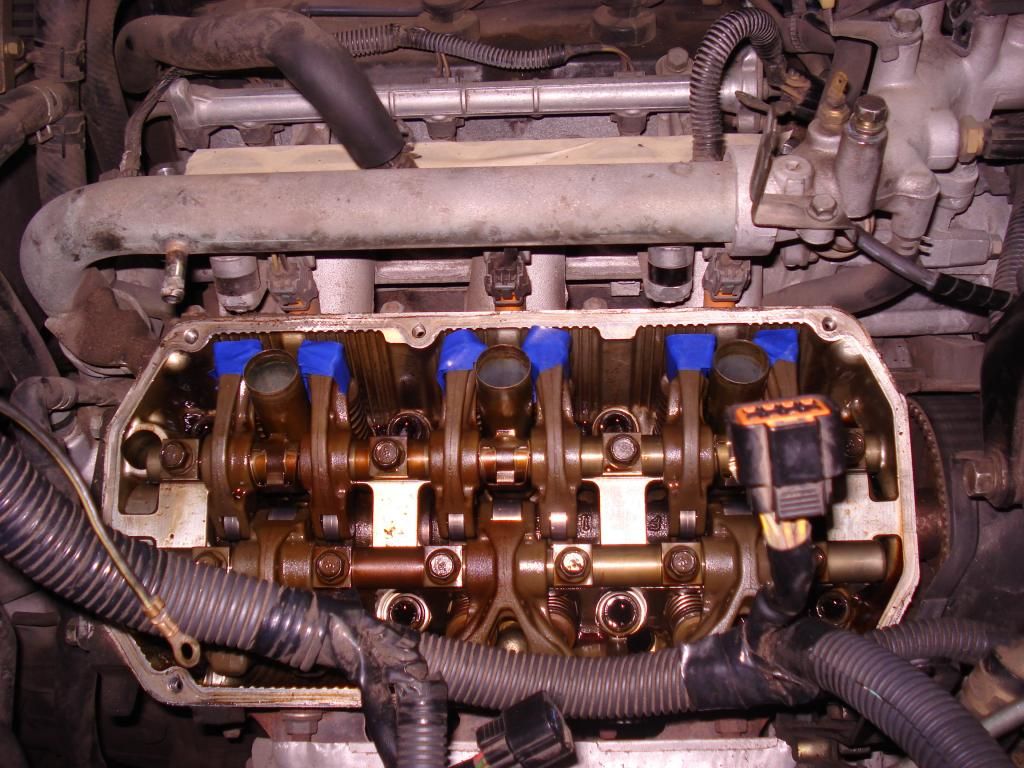
The picture below shows the passenger side head after I loosened the intake rocker shaft and wrapped the ends in electrical tape to retain the lash adjusters (HLAs). Electrical tape was difficult, so after this I used masking tape which was much easier. If I had to do it again, I would have done the drivers side first, just because most of the valves springs are easier on that side.
The real key to this job is having the right valve spring compressor tool. I am only aware of three types that are commonly available. There's the Schley tool, which has a frame that bolts to the head, a rod that acts as a fulcrum, and a lever that you push to compress the spring. This takes some fiddling to set up, because the springs must be compressed axially. If it's off center, the valve gets pushed down with the spring, letting air out of the cylinder. Another problem is that while you're compressing with one hand, you only have one left to get the keepers out and back in. Another poblem is that you must have clearance for 5 or 6 inches above the valve. This is a problem on the passenger side head of my 3.5 L engine, because there's a coolant pipe running over the intake valves. I bought a cheap $50 knock-off of the Schley tool. I had to cut several inches off the fulcrum rod to get it to fit over the head.
The second tool is the GA317, which is a hollow pipe with a magnet inside, and an attachment that has a spring-loaded pin. To remove the valve retainer, you just set the pipe on top and whack it with your BFH (big hammer). Amazingly fast. The keepers and retainer end up stuck to the end of the tool. To reinstall the valve, you preload the keepers into the retainer and set them on top of the valve, and them press down really hard with the spring loaded attachment. There's a satisfying click, and you're done. If you can't get leverage to press hard enough, a good wack with the BFH gets the job done. The problem is that this all must be done perfectly axially. If you're off center, then the valve gets pushed down, resulting in a terrifying bang when the pressurized cylinder lets air out through the intake. Yikes. The other problem is that you must have clearance for a the long pipe, plus room to swing a hammer. There is definitely not enough room for this on the exhaust valves of cylinders 5 and 6. I had a hard time using it on any of the exhaust valves, but it made most of the intakes go amazingly fast. Bang bang and you're done. I had to remove other parts, like the EGR tube, to get access for this and the Schley tool.
The third tool is the more conventional claw-type compressor that has fingers that reach down into the spring and compresses with a clamp. I wished I had one, but others have said they only work with significant modification due to clearance issues between the springs.
I did about half with the Schley tool, and half with the GA317. I used the GA317 wherever I could, because it was so fast and easy. In the end, I have to admit that I changed only 23 of the 24 seals. I couldn't get access to one intake valve on cylinder #1, because the coolant pipe was in the way and couldn't figure out how to get it with either of my tools. I'm not a perfectionist so I left it at that.
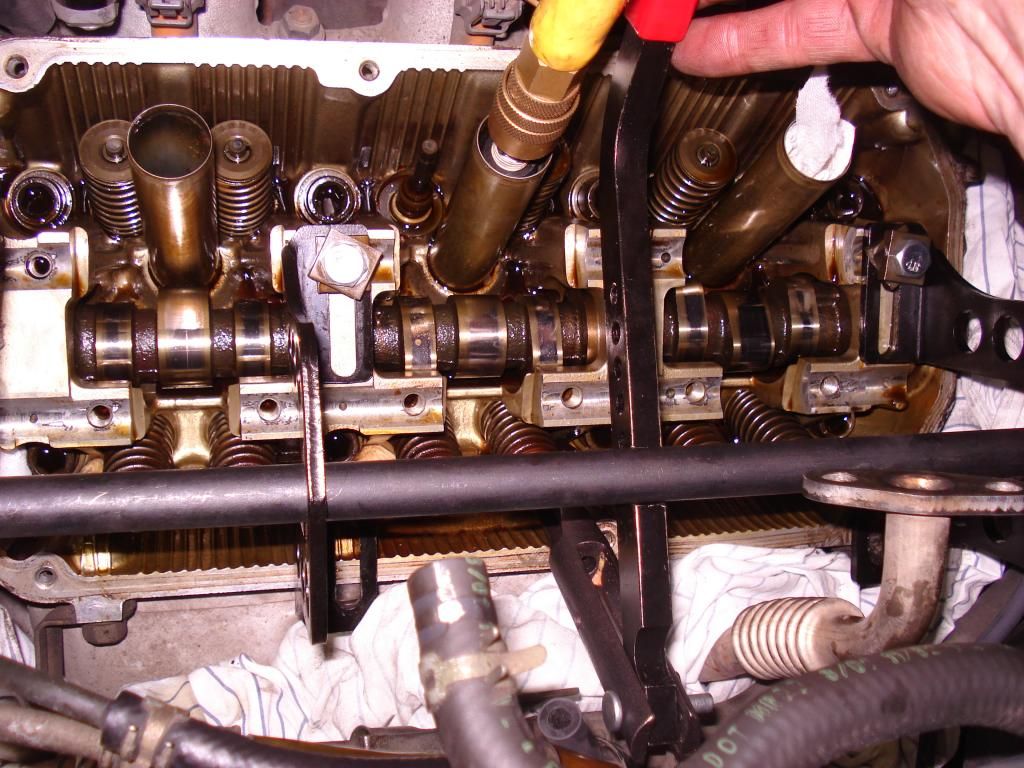
The photo below shows the Schley-like tool in action. It is bolted to the intake rocker shaft holes. I'm pulling up on the red handle to compress a cylinder 4 exhaust valve. You can see that I've removed a spring on an intake valve already.
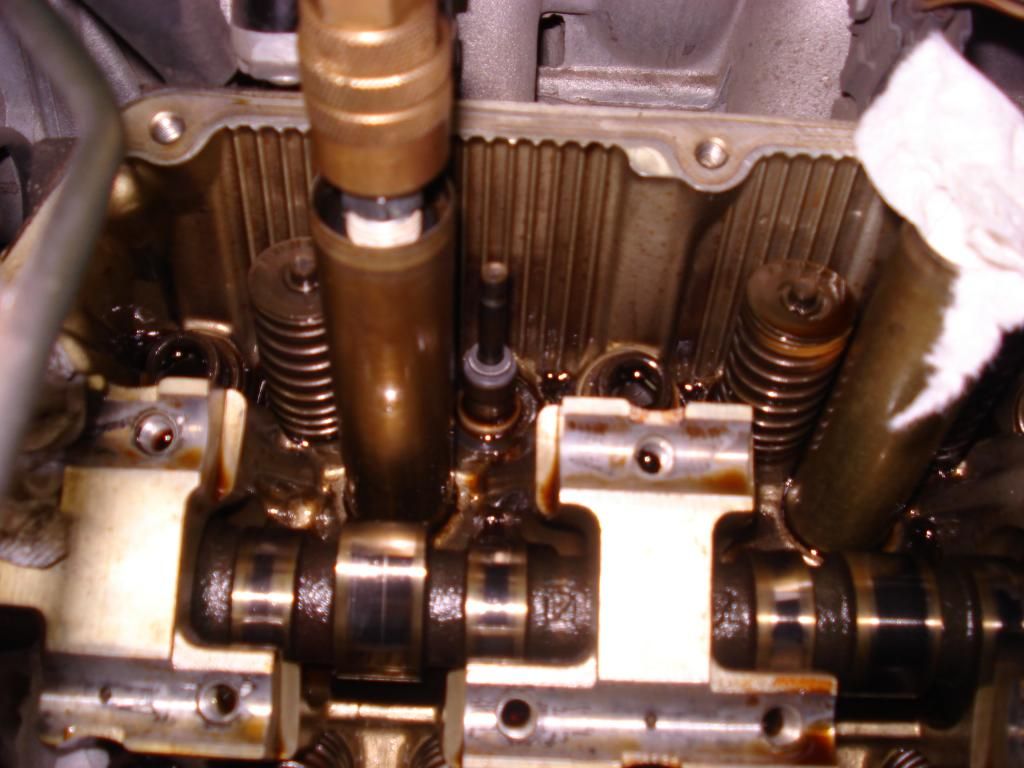
This next picture shows a new seal on an intake valve.
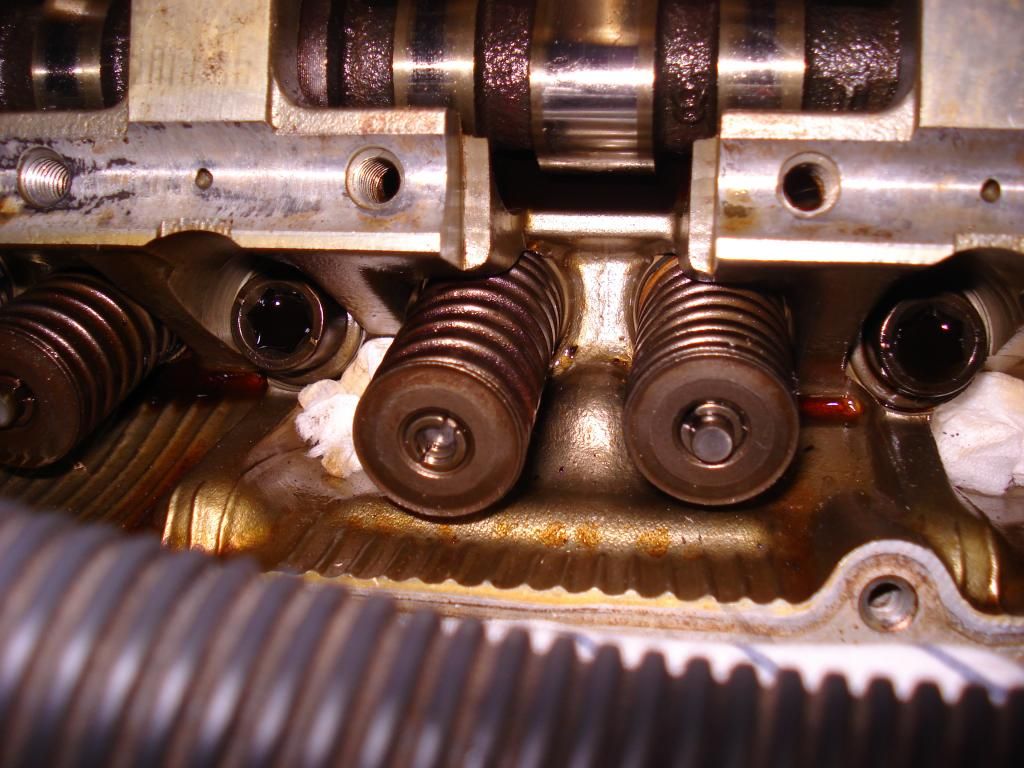
This picture shows one exhaust valve spring with the retainer and keepers preloaded in preparation for reinstallation using the GA317 tool. The spring on the right is secured.
Here are some other random thoughts:
1. I spent a lot of time making sure that I sealed off all the holes where some part could get lost and/or do some damage. This is especially the oil return holes in the heads and the intake ports, but there are other places to seal off with tape or clean rags. There were at least three times that a keeper fell onto the towels that I had plugging those oil return holes. I also stuffed towels throughout the engine bay to may it easier to recover parts. I still dropped them a lot, and used my magnetic pick-up tool more than any other tool.
2. I used needle nose pliers to pull the old seals, and a deep socket to seat the new ones. Wished I had better tools for this process. Valve seal pliers are $18 and mighta saved an hour and some frustration. Hope I didn't scratch any valve stems with my pliers.
3. Might be nice to buy a spare keeper or two. I launched a couple across the garage, and was lucky to find them.
4. I used all OEM parts (NGK spark plugs & wires), and had no problems with them. Did not replace the rear cam seals, since mine were replaced at 90k and look good.
www.mitsubishi-forums.com/index.php?showtopic=58569&st=0#entry321073
www.youtube.com/watch?v=gDPgVfeLBhQ
www.4x4wire.com/mitsubishi/tech/lower_plenum/
www.justanswer.com/mitsubishi/7leiw-mitsubishi-montero-sport-ls-need-replace-valve-cover.html
www.monterosportonline.net/?page_id=531
www.4x4wire.com/forums/showflat.php?Cat=81&Number=1147478&page=1&fpart=1&vc=1
www.youtube.com/watch?v=yYHoKfBxLLs
www.4x4wire.com/forums/printthread.php?Board=UBB93&main=369544&type=post
www.3si.org/forum/f58/make-your-own-valve-spring-compressor-15-a-217700/
www.youtube.com/watch?v=ABOm_Usrf4k
www.youtube.com/watch?v=aP9GJuHO7N8
You should know that this is not an easy job. I'm an OK shadetree mechanic, with experience just maintaining my own older cars for almost 30 years. I have a nice garage and a decent set of tools. This pushed my limits and took me about 16 hours. There are people on this board who know way more than me about this, and I hope they correct anything incorrect or misleading here. In the end, nothing really went wrong, and there is no more smoke.
There are plenty of instructions for how to remove the valve covers. That much took me about 3 hours, while taking notes and photos. The previous owner had replaced the plugs at 90,000 miles, so there were no problems getting things apart. I chose to leave the throttle body attached to the intake and completely remove them together, which required draining a gallon of coolant, because I just wanted everything out of the way.
I used compressed air (with a cheap little HF compressor) to hold the valves place after removing the springs. Did not regulate the pressure.
The picture below shows the passenger side head after I loosened the intake rocker shaft and wrapped the ends in electrical tape to retain the lash adjusters (HLAs). Electrical tape was difficult, so after this I used masking tape which was much easier. If I had to do it again, I would have done the drivers side first, just because most of the valves springs are easier on that side.
The real key to this job is having the right valve spring compressor tool. I am only aware of three types that are commonly available. There's the Schley tool, which has a frame that bolts to the head, a rod that acts as a fulcrum, and a lever that you push to compress the spring. This takes some fiddling to set up, because the springs must be compressed axially. If it's off center, the valve gets pushed down with the spring, letting air out of the cylinder. Another problem is that while you're compressing with one hand, you only have one left to get the keepers out and back in. Another poblem is that you must have clearance for 5 or 6 inches above the valve. This is a problem on the passenger side head of my 3.5 L engine, because there's a coolant pipe running over the intake valves. I bought a cheap $50 knock-off of the Schley tool. I had to cut several inches off the fulcrum rod to get it to fit over the head.
The second tool is the GA317, which is a hollow pipe with a magnet inside, and an attachment that has a spring-loaded pin. To remove the valve retainer, you just set the pipe on top and whack it with your BFH (big hammer). Amazingly fast. The keepers and retainer end up stuck to the end of the tool. To reinstall the valve, you preload the keepers into the retainer and set them on top of the valve, and them press down really hard with the spring loaded attachment. There's a satisfying click, and you're done. If you can't get leverage to press hard enough, a good wack with the BFH gets the job done. The problem is that this all must be done perfectly axially. If you're off center, then the valve gets pushed down, resulting in a terrifying bang when the pressurized cylinder lets air out through the intake. Yikes. The other problem is that you must have clearance for a the long pipe, plus room to swing a hammer. There is definitely not enough room for this on the exhaust valves of cylinders 5 and 6. I had a hard time using it on any of the exhaust valves, but it made most of the intakes go amazingly fast. Bang bang and you're done. I had to remove other parts, like the EGR tube, to get access for this and the Schley tool.
The third tool is the more conventional claw-type compressor that has fingers that reach down into the spring and compresses with a clamp. I wished I had one, but others have said they only work with significant modification due to clearance issues between the springs.
I did about half with the Schley tool, and half with the GA317. I used the GA317 wherever I could, because it was so fast and easy. In the end, I have to admit that I changed only 23 of the 24 seals. I couldn't get access to one intake valve on cylinder #1, because the coolant pipe was in the way and couldn't figure out how to get it with either of my tools. I'm not a perfectionist so I left it at that.
The photo below shows the Schley-like tool in action. It is bolted to the intake rocker shaft holes. I'm pulling up on the red handle to compress a cylinder 4 exhaust valve. You can see that I've removed a spring on an intake valve already.
This next picture shows a new seal on an intake valve.
This picture shows one exhaust valve spring with the retainer and keepers preloaded in preparation for reinstallation using the GA317 tool. The spring on the right is secured.
Here are some other random thoughts:
1. I spent a lot of time making sure that I sealed off all the holes where some part could get lost and/or do some damage. This is especially the oil return holes in the heads and the intake ports, but there are other places to seal off with tape or clean rags. There were at least three times that a keeper fell onto the towels that I had plugging those oil return holes. I also stuffed towels throughout the engine bay to may it easier to recover parts. I still dropped them a lot, and used my magnetic pick-up tool more than any other tool.
2. I used needle nose pliers to pull the old seals, and a deep socket to seat the new ones. Wished I had better tools for this process. Valve seal pliers are $18 and mighta saved an hour and some frustration. Hope I didn't scratch any valve stems with my pliers.
3. Might be nice to buy a spare keeper or two. I launched a couple across the garage, and was lucky to find them.
4. I used all OEM parts (NGK spark plugs & wires), and had no problems with them. Did not replace the rear cam seals, since mine were replaced at 90k and look good.