


Post by amatti73 on Jun 7, 2010 14:36:32 GMT -5
The remote control buttons on the steering wheel Pajero Sport
So, take remote control of ALPINE and parses it - we are only interested in fee

and buy 2 remote conrol from JVC for $ 5 apiece
штуку

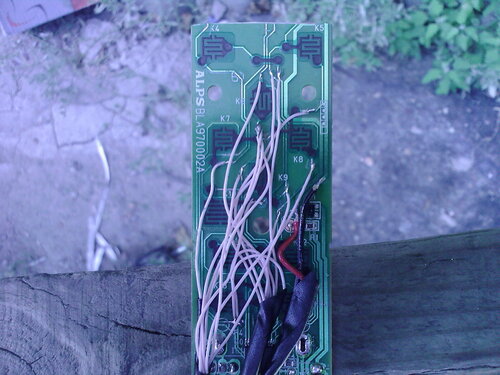
and also dismantle them to pay with your contacts and the joystick for 5 positions. However, the need to sacrifice one of them - it will be realized central click SOURCE.It needs to break down and in its place to drill a hole 3 or 4 mm in order to be able to solder 4 wires to the 4 buttons, or in any way. And be sure to crop circuit board top and bottom.


Now you need to produce food ALPINE remote from the onboard vehicle network, that is from 12-14 volts to 3 volts. To do this, buy on the radio market stabilizer on the LD117 (the stabilization of up to 3.3 volts), the capacitor on 470mkf/25volt, and any INFRA-RED diode current up to 1 Amp. He is needed to reduce the voltage from 3.3 volts to 3 volts. Unsolder the spring contacts on the + and - and + contact from staff capacitor 47mkf and replace it with solder in the diode cathode and its anode connected to + capacitor and an output (average output) stabilizer.Cabinet concluded solder in circuit board to -. A log of the stabilizer and + Capasitor on 470mkf sodinyaem together and display a wire that is connected to 12 volt rule. I did Capasitor on 470mkf remote ie Do not attach to the board, and brought to the postings, sinceits diameter is large enough and the board would not go with him to a coveted place between the rear wheel housing and iron lateral spokes on the left. Plus and minus 12Volt take on the wires in the connector that goes to the steering wheel on the throttle cruise control - Blue 12, and black-12 (they are extreme).The average wire - black with a white stripe not touching on it is management.
More on this panel define all the tracks where tipsy then posting the new joysticks, cables and rendered IR LED and supply wires. Given that the need to cut the top of the console - where there are buttons SOURCE, POWER, VOLUME -, VOLUME + and LED.Thus the circuit board shortened by 3cm. Here is a photo with another neotpilennymi buttons VOLUME -, VOLUME +.
This is how a joystick to set the wheel - the rubber pad with buttons must be in a couple of places to grab superglue to facilitate their installation.

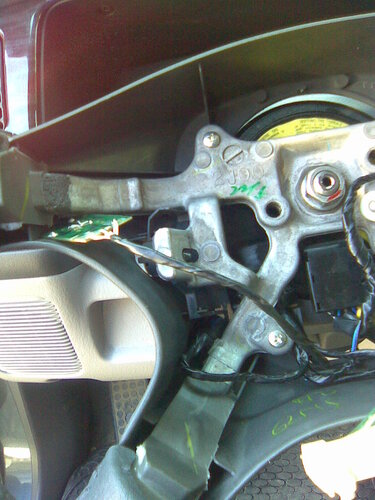
To withdraw from the steering pad AIRBAG on the back of the left and right upper spokes are smart nosadochnye place about 33 * 43mm so even with the possibility of fixing screw to 3 on each side. We really put joysticks with boards in these niches and make note where the hole diameter of 21mm.Boards with joysticks are pressed against the steering wheel with wooden shims and polyurethane foam (automotive obesshumka) and all pressed glass-foil lids with 3 holes at 3 screw.
IR LED mounted on the bracket to the back of the right lower spokes of steering.
And looks in the collection.


The service works perfectly even when you turn the steering + 40gradusov his normal position.
On the left joystick implemented SOURCE, VOLUME -, VOLUME +, MUTE
On the right joystick implemented PRESET +, PRESET-(click on the already configured radio stations), SEARCH +, SEARCH-(tuning stations or rewind through tracks on the disk).
Please prposchenie for pictures ... colors slightly skewed - steering wheel is gray and blue buttons ... Cost not counting the work - $ 13.
and it is hidden ALPINE console (to make it easier to find a look at the bottom bends wires on joysticks, Capasitor and IR LED).
It is only in the pictures it seems that the buttons far to the spokes, but in fact when the hand on the tiller "ten two", it is enough to stretch out the thumb and it falls exactly on the button. And it is all very easy and simple, even a blind, because once on the joystick left thumb tern either right or left, either up or down.
And if any other version control placement is necessary to move the whole hand on the rim and, then click on the button - it can be seen on your Illustrations and a bit on Pajero4 so. I was originally not one of them.
Because when you install the buttons on the run occurred much crap, and everything needed to make the first approach, it really sticks can be pushed to 3-4mm on the rim steering wheel.
For any very comfortable and more importantly - safe!!
Sorry for my english !!!!!!!
So, take remote control of ALPINE and parses it - we are only interested in fee
and buy 2 remote conrol from JVC for $ 5 apiece
штуку
and also dismantle them to pay with your contacts and the joystick for 5 positions. However, the need to sacrifice one of them - it will be realized central click SOURCE.It needs to break down and in its place to drill a hole 3 or 4 mm in order to be able to solder 4 wires to the 4 buttons, or in any way. And be sure to crop circuit board top and bottom.
Now you need to produce food ALPINE remote from the onboard vehicle network, that is from 12-14 volts to 3 volts. To do this, buy on the radio market stabilizer on the LD117 (the stabilization of up to 3.3 volts), the capacitor on 470mkf/25volt, and any INFRA-RED diode current up to 1 Amp. He is needed to reduce the voltage from 3.3 volts to 3 volts. Unsolder the spring contacts on the + and - and + contact from staff capacitor 47mkf and replace it with solder in the diode cathode and its anode connected to + capacitor and an output (average output) stabilizer.Cabinet concluded solder in circuit board to -. A log of the stabilizer and + Capasitor on 470mkf sodinyaem together and display a wire that is connected to 12 volt rule. I did Capasitor on 470mkf remote ie Do not attach to the board, and brought to the postings, sinceits diameter is large enough and the board would not go with him to a coveted place between the rear wheel housing and iron lateral spokes on the left. Plus and minus 12Volt take on the wires in the connector that goes to the steering wheel on the throttle cruise control - Blue 12, and black-12 (they are extreme).The average wire - black with a white stripe not touching on it is management.
More on this panel define all the tracks where tipsy then posting the new joysticks, cables and rendered IR LED and supply wires. Given that the need to cut the top of the console - where there are buttons SOURCE, POWER, VOLUME -, VOLUME + and LED.Thus the circuit board shortened by 3cm. Here is a photo with another neotpilennymi buttons VOLUME -, VOLUME +.
This is how a joystick to set the wheel - the rubber pad with buttons must be in a couple of places to grab superglue to facilitate their installation.
To withdraw from the steering pad AIRBAG on the back of the left and right upper spokes are smart nosadochnye place about 33 * 43mm so even with the possibility of fixing screw to 3 on each side. We really put joysticks with boards in these niches and make note where the hole diameter of 21mm.Boards with joysticks are pressed against the steering wheel with wooden shims and polyurethane foam (automotive obesshumka) and all pressed glass-foil lids with 3 holes at 3 screw.
IR LED mounted on the bracket to the back of the right lower spokes of steering.
And looks in the collection.
The service works perfectly even when you turn the steering + 40gradusov his normal position.
On the left joystick implemented SOURCE, VOLUME -, VOLUME +, MUTE
On the right joystick implemented PRESET +, PRESET-(click on the already configured radio stations), SEARCH +, SEARCH-(tuning stations or rewind through tracks on the disk).
Please prposchenie for pictures ... colors slightly skewed - steering wheel is gray and blue buttons ... Cost not counting the work - $ 13.
and it is hidden ALPINE console (to make it easier to find a look at the bottom bends wires on joysticks, Capasitor and IR LED).
It is only in the pictures it seems that the buttons far to the spokes, but in fact when the hand on the tiller "ten two", it is enough to stretch out the thumb and it falls exactly on the button. And it is all very easy and simple, even a blind, because once on the joystick left thumb tern either right or left, either up or down.
And if any other version control placement is necessary to move the whole hand on the rim and, then click on the button - it can be seen on your Illustrations and a bit on Pajero4 so. I was originally not one of them.
Because when you install the buttons on the run occurred much crap, and everything needed to make the first approach, it really sticks can be pushed to 3-4mm on the rim steering wheel.
For any very comfortable and more importantly - safe!!
Sorry for my english !!!!!!!

